Revit software, the industry-standard Building Information Modeling (BIM) platform, is more than just a 3D modeling tool; it’s a collaborative powerhouse transforming how buildings are designed, constructed, and managed. From architects sketching initial concepts to engineers fine-tuning structural details and MEP systems, Revit empowers professionals across disciplines to work together seamlessly on complex projects. This guide dives into the core functionalities, offering a comprehensive overview for both beginners and experienced users looking to level up their Revit skills.
We’ll explore everything from the basics of navigation and project creation to advanced techniques like parametric modeling and Dynamo scripting. We’ll also compare Revit to other BIM software, discuss best practices for collaboration and data management, and delve into its powerful rendering and visualization capabilities. Whether you’re aiming to master Revit for architectural design, structural engineering, or MEP systems, this guide provides a roadmap to success.
Revit Software Overview
Revit, Autodesk’s flagship Building Information Modeling (BIM) software, is a powerful tool used by architects, engineers, and construction professionals worldwide to design, document, and construct buildings and infrastructure. It’s known for its collaborative capabilities and its ability to create a central, coordinated model that streamlines the entire building process. This overview will delve into Revit’s core functionalities, version differences, and comparisons with other BIM software.Revit’s core functionality centers around creating a parametric model.
This means that elements within the model are not just visual representations, but contain data that drives their behavior. Changing one parameter, like a wall thickness, automatically updates related elements, ensuring consistency and accuracy throughout the project. Key features include architectural modeling, structural analysis tools, MEP (Mechanical, Electrical, and Plumbing) system design, and visualization capabilities. The software allows for detailed design, energy analysis, cost estimation, and clash detection, leading to more efficient and less error-prone projects.
Revit Versions and Key Features
Different Revit versions offer varying levels of functionality and capabilities. While specific features can change between releases, generally, newer versions incorporate enhanced performance, improved user interface elements, and added functionalities. For example, Revit 2024 might include improved rendering capabilities or advanced analysis tools not present in earlier versions like Revit 2022. Users often choose a version based on their specific needs and budget, considering factors like project complexity and the availability of necessary add-ins.
Choosing the correct version depends heavily on project requirements and the team’s skillset. Older versions might still be sufficient for smaller projects, while larger, more complex projects benefit from the latest features and performance enhancements of the newest releases.
Revit Compared to Other BIM Software
Revit competes with other BIM software such as ArchiCAD, Vectorworks Architect, and Tekla Structures. While all these programs facilitate BIM workflows, they have different strengths and weaknesses. Revit is often praised for its robust parametric modeling and strong integration within the Autodesk ecosystem. However, some users find the learning curve steeper compared to other options. ArchiCAD, for example, is known for its user-friendly interface, while Tekla Structures specializes in structural modeling and detailing.
The choice of software depends on the specific needs of the project and the preferences of the design team. A team experienced with ArchiCAD might find it more efficient to stick with that platform, while a firm deeply invested in the Autodesk suite would likely prefer Revit for its seamless integration. Ultimately, the “best” software is subjective and depends on various factors.
Revit Interface and Navigation
Okay, so you’ve got Revit open – congrats! Now, let’s get you comfy with navigating this beast. It might seem overwhelming at first, but trust me, with a little practice, you’ll be zooming around like a pro. This section will cover the basics of getting around the Revit interface and starting a new project.
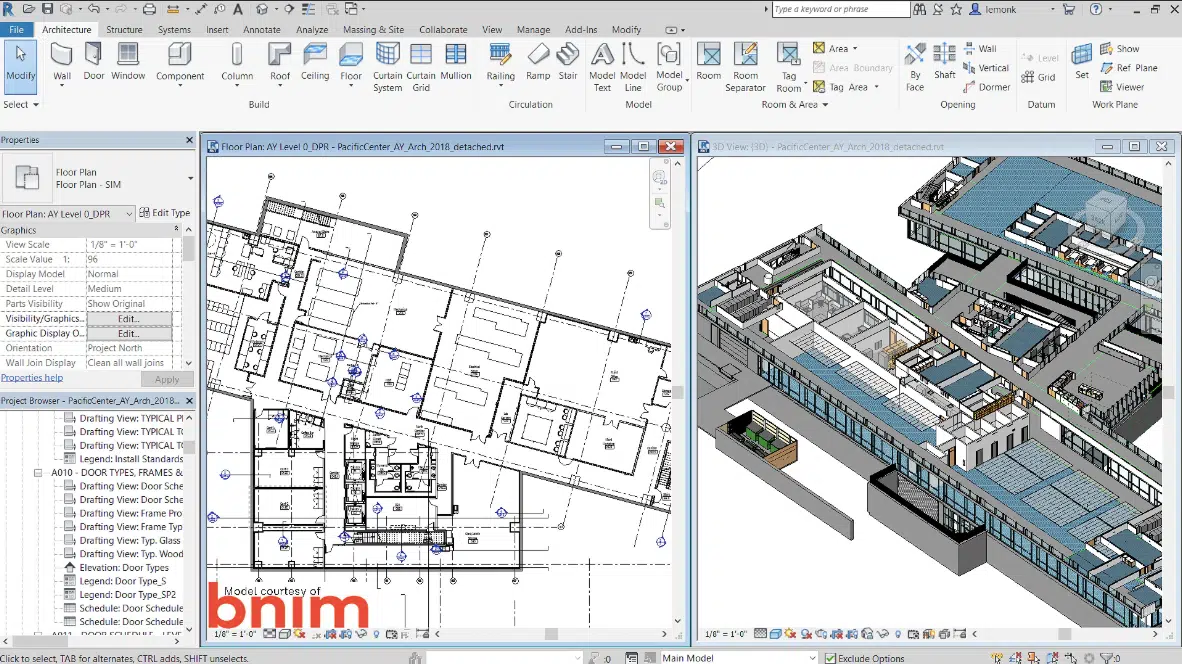
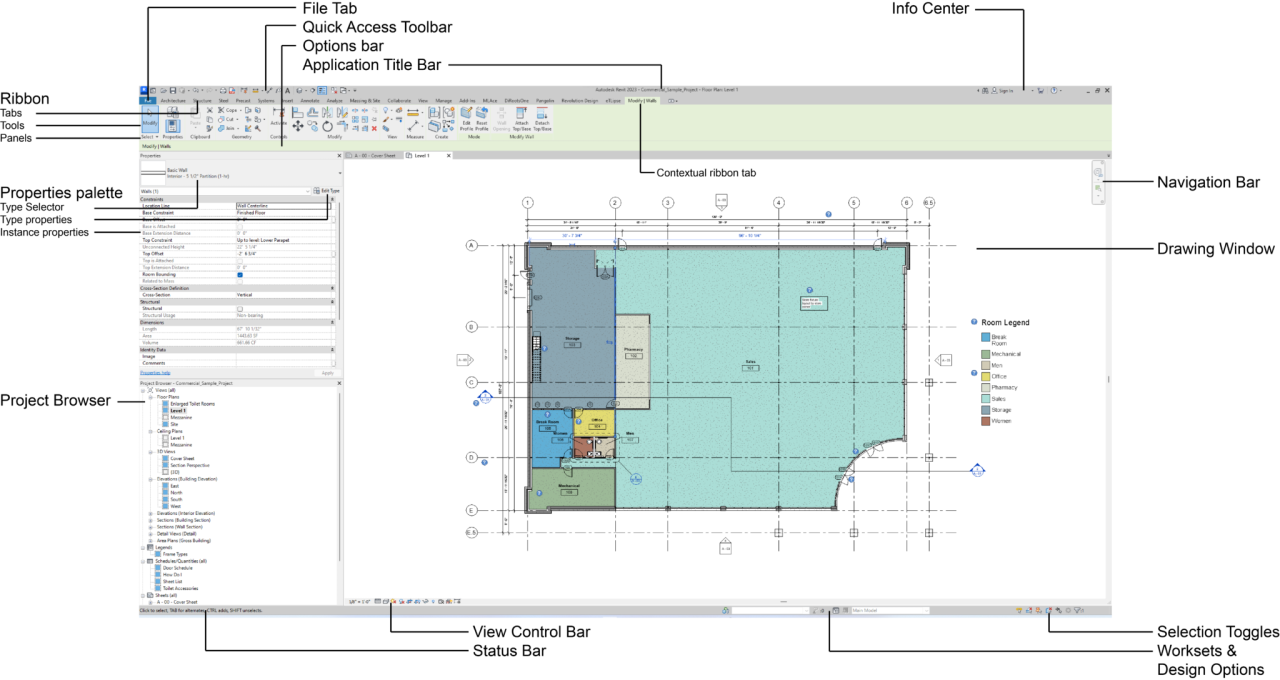
Revit’s interface is ribbon-based, similar to other Autodesk products like AutoCAD. The main area is your workspace where you’ll build your models. You’ll find various palettes, toolbars, and the Project Browser, all crucial for managing your project. Understanding the basic navigation tools is key to efficient workflow.
Basic Navigation in the Revit Interface
Navigating the 3D model is key. You’ll use the tools in the “ViewCube” to quickly orient yourself. Clicking and dragging the ViewCube rotates the view. The “Orbit” tool lets you smoothly rotate around the model. The “Zoom” tool, accessible through the mouse wheel or the dedicated buttons, adjusts the view’s magnification.
Finally, the “Pan” tool allows you to move the view horizontally and vertically, useful for exploring large models. Mastering these four tools—ViewCube, Orbit, Zoom, and Pan—will significantly improve your workflow. Think of it like learning to drive – at first, it’s a lot to take in, but soon it becomes second nature.
Creating a New Project in Revit
Let’s get you building! First, you’ll see the Revit startup screen. Click “New” to begin. Next, you’ll choose a template. Revit offers various templates based on different project types (architectural, structural, MEP). Select the appropriate template for your project – picking the wrong one early on can lead to some serious headaches later.
Once you’ve chosen a template, give your project a name and select a location to save it. Click “Open” and you’re ready to design! Remember to save frequently – trust me on this one, you don’t want to lose hours of work!
Tips and Tricks for Efficient Use of Revit’s Interface Tools
Here are a few pro-tips to boost your Revit game. These little tricks can save you tons of time and frustration in the long run.
- Keyboard Shortcuts: Learn the keyboard shortcuts! Seriously, this is a game-changer. Many actions have shortcuts, making your workflow much faster. Revit’s help menu is a great resource for discovering these shortcuts.
- View Templates: Use view templates to standardize your views. Create a template with your preferred settings (grid lines, annotations, etc.), and apply it to multiple views for consistency.
- Worksets: For large projects, utilize worksets to divide the model into manageable sections. This allows multiple users to work on the same project concurrently without stepping on each other’s toes.
- Project Browser Organization: Keep your Project Browser organized. Use folders to group similar views and sheets, making it easier to locate specific elements.
- Customization: Customize your ribbon and toolbars to suit your preferences. Hide rarely used tools and bring frequently used ones to the forefront for easy access.
Modeling Techniques in Revit
Okay, so you’ve got the basics of Revit down – you know where everything is, you can navigate the interface. Now it’s time to get your hands dirty and actually
build* something. This section dives into the core of Revit
modeling. We’ll cover creating basic elements, using families (which are basically customizable building blocks), and planning out your workflow for larger projects.
Revit’s strength lies in its parametric modeling. This means that your models are built using intelligent components that respond to changes in design. Change the length of a wall, and connected elements automatically adjust. This saves you tons of time and prevents errors.
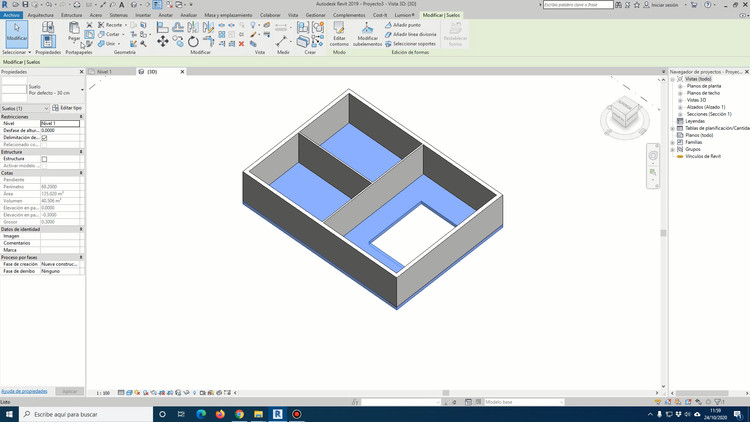
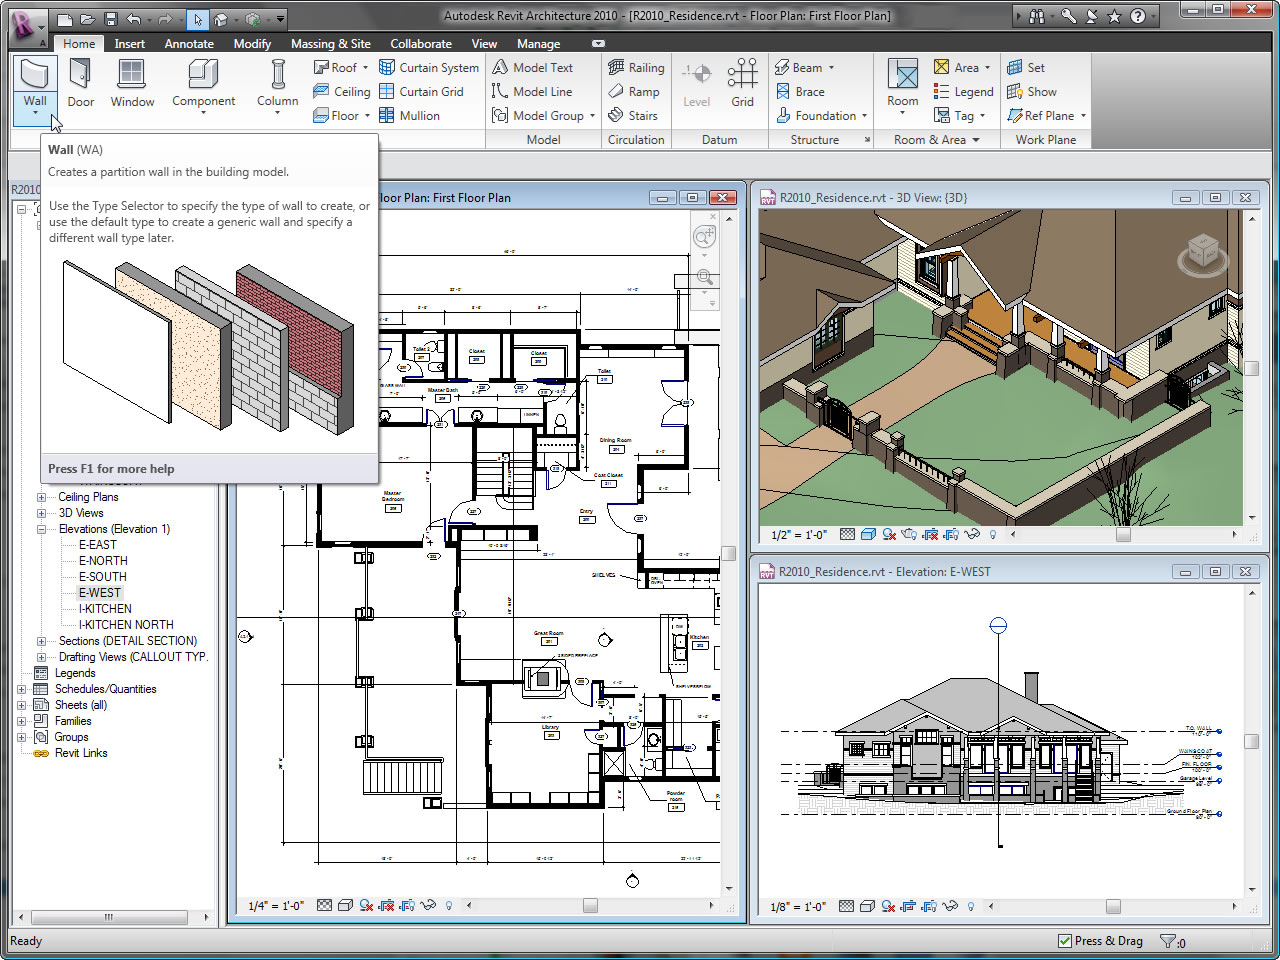
Creating Walls, Floors, and Roofs
Creating walls, floors, and roofs in Revit is surprisingly intuitive once you get the hang of it. You basically draw lines or shapes, specify their properties (thickness, material, height, etc.), and Revit does the rest. For example, to create a wall, you’d select the “Wall” tool, click and drag to define the wall’s location and length, and then adjust its properties in the Properties palette.
Revit’s awesome for building models, but sometimes you need to share your work as a PDF. That’s where a solid pdf writer comes in handy; it lets you easily export your detailed Revit designs into a clean, shareable format. After you’ve got that PDF, you can send it to your professor or client, no problem.
Revit’s great, but a good PDF writer makes the whole process way smoother.
Floors are similar; you define the area you want to cover, select the floor type, and you’re done. Roofs are a bit more complex, often involving multiple planes and shapes, but the basic principle remains the same: define the shape and properties, and Revit creates the geometry. Think of it like digital LEGOs, but way more sophisticated.
You can easily modify these elements later; if you need to extend a wall, simply grab the end and drag it to the desired length. Revit automatically updates connected elements, making the process incredibly efficient.
Using and Customizing Families
Families are pre-made components that you can use to populate your model – think doors, windows, furniture, even entire building systems. Revit comes with a huge library of families, but you can also create your own or download them from various online resources. Customizing families allows you to create unique elements perfectly suited to your project’s needs. For example, you could create a custom family for a specific type of window, specifying its dimensions, material, and even the type of glass used.
This level of detail is what makes Revit so powerful for creating realistic and accurate building models. You can control things like the number of panels in a door, the type of material for a specific window, or even create parametric families that adjust their dimensions based on input parameters.
Workflow for Modeling a Complex Building Structure
Modeling a complex building requires a structured approach. Here’s a suggested workflow:
First, you’ll want to start with a solid conceptual design. This usually involves sketches, diagrams, and potentially some initial 2D modeling. Next, you’ll import your 2D plans into Revit, using them as a base for your 3D model. Then, you’ll start building your core structural elements – walls, floors, and roofs – layer by layer. As you build, you’ll incorporate your custom families and standard families for doors, windows, and other components.
Finally, you’ll refine the model, adding details and ensuring everything is properly coordinated. This iterative process involves constant checking and adjustments to ensure accuracy and consistency.
Comparison of Modeling Approaches
Different approaches exist for modeling complex structures in Revit. Here’s a comparison:
| Method | Pros | Cons |
|---|---|---|
| Top-Down Modeling | Organised, good for large projects, easier to manage | Can be inflexible, requires detailed initial planning |
| Bottom-Up Modeling | More flexible, easier to start with less planning | Can become disorganized, more difficult to manage large projects |
| Hybrid Modeling | Combines the best of both, allows flexibility while maintaining organization | Requires a good understanding of both methods |
Revit for Specific Disciplines: Revit Software
Revit’s power lies in its ability to transcend individual disciplines and facilitate collaborative design. While it’s a single platform, its robust toolset caters specifically to the needs of architects, structural engineers, and MEP (Mechanical, Electrical, Plumbing) engineers, enabling seamless integration and coordination throughout the project lifecycle. This section will explore how Revit empowers each of these key players.
Revit in Architectural Design
Architects utilize Revit to create detailed building models, encompassing everything from initial conceptual designs to construction documentation. The software allows for the creation of 3D models, which can be readily manipulated and analyzed. Features such as massing studies enable architects to explore various design options efficiently, while detailed component modeling allows for precise control over building elements. Furthermore, Revit facilitates the generation of 2D drawings directly from the 3D model, ensuring consistency and reducing the potential for errors.
This integrated approach streamlines the design process, enabling architects to focus on creative problem-solving rather than tedious drafting tasks. For example, an architect could use Revit to quickly generate multiple iterations of a building facade, testing different materials and configurations before settling on a final design. The ability to link these models to energy analysis tools also allows for early consideration of sustainability goals.
Revit in Structural Engineering
Structural engineers leverage Revit’s analytical capabilities to model and analyze building structures. The software allows for the creation of detailed structural models, incorporating elements such as beams, columns, and foundations. These models can then be analyzed using integrated or linked structural analysis software to determine stresses, deflections, and other critical parameters. Revit’s ability to manage different structural materials and their properties is crucial for accurate analysis.
Furthermore, the software facilitates the creation of detailed shop drawings, providing clear instructions for fabricators and contractors. For instance, a structural engineer could use Revit to model a complex steel frame, analyzing its performance under various load conditions. The software’s ability to automatically generate fabrication drawings from the model significantly reduces the risk of errors and speeds up the construction process.
Revit for MEP Engineering
MEP engineers rely on Revit’s specialized tools for designing and coordinating mechanical, electrical, and plumbing systems. Revit provides dedicated tools for modeling ductwork, piping, conduit, and other MEP components. These tools allow engineers to create detailed 3D models of the systems, ensuring proper routing and coordination with other building elements. Features such as clash detection help to identify and resolve conflicts between different systems before construction begins, minimizing costly rework on site.
Furthermore, Revit enables the generation of detailed schedules and quantities, facilitating accurate cost estimation and procurement. A specific example would be the design of a complex HVAC system within a high-rise building. Using Revit, the MEP engineer can model the entire system, including ductwork, piping, and equipment, ensuring proper sizing and placement. Clash detection would then highlight any conflicts with architectural or structural elements, allowing for proactive resolution.
The software’s ability to generate detailed schedules and quantities is crucial for accurate cost estimation and procurement.
Collaboration and Teamwork in Revit
Revit’s collaborative features are crucial for successful project delivery, especially on large, complex projects involving multiple disciplines. Effective teamwork and communication are key to avoiding conflicts, streamlining workflows, and ensuring a high-quality final product. This section will explore best practices for collaborative workflows, revision management, and communication strategies within Revit projects.
Successful Revit collaboration hinges on a well-defined workflow, clear communication channels, and a commitment to using Revit’s built-in collaboration tools. Ignoring these aspects can lead to model clashes, duplicated efforts, and ultimately, project delays and cost overruns. Properly leveraging Revit’s capabilities fosters a streamlined and efficient design process.
Best Practices for Collaborative Workflows
Implementing a structured workflow is essential for effective collaboration. This includes establishing clear roles and responsibilities for each team member, defining model standards and naming conventions, and regularly syncing the central model. Using a well-defined process, such as the BIM (Building Information Modeling) process, allows for a systematic approach to managing the project’s lifecycle. For instance, a team might assign one person as the model manager responsible for coordinating updates and resolving conflicts, while others focus on specific aspects of the design.
Consistent use of shared parameters and families ensures data consistency across the entire model. Regular synchronization of the central model, perhaps daily or even multiple times a day depending on the project’s size and complexity, prevents significant conflicts from arising.
Managing Revisions and Coordinating Changes
Revit’s version control and worksharing features are instrumental in managing revisions and coordinating changes. The process typically involves establishing a central model, which team members work on concurrently. Revit’s worksharing capabilities allow multiple users to edit the model simultaneously without overwriting each other’s work. Regular model synchronization is crucial to update each user’s local copy with the latest changes and to identify any potential conflicts.
Revit’s change tracking tools allow team members to identify the specific changes made, who made them, and when. This helps to resolve conflicts efficiently and to maintain a clear audit trail of project modifications. Consider implementing a robust change management system, perhaps involving a designated reviewer who approves all changes before they are integrated into the central model.
Effective Communication Strategies
Clear and consistent communication is vital for successful Revit collaboration. Regular team meetings, both in-person and virtual, are essential to discuss project progress, identify potential issues, and coordinate efforts. Utilizing a centralized communication platform, such as a project management software or a dedicated communication channel within a collaborative workspace, helps keep everyone informed and engaged. The use of clear and concise communication methods, including detailed model annotations and comments, minimizes misunderstandings and ensures that everyone is on the same page.
Documenting decisions and changes through meeting minutes, email correspondence, and model annotations helps maintain a comprehensive project record and facilitates future reference. Furthermore, regular reviews of the model help identify and address issues early, preventing more significant problems down the line.
Revit Rendering and Visualization

Revit, while primarily a Building Information Modeling (BIM) software, offers surprisingly robust rendering capabilities. These tools allow you to create visually compelling presentations of your designs, aiding in client communication and internal design reviews. However, Revit’s rendering engine isn’t designed for photorealistic imagery in the same way as dedicated rendering software. Understanding its strengths and limitations is key to effective visualization.Revit’s rendering options range from quick, low-resolution previews to higher-quality renders that take longer to process.
The built-in rendering engine uses a ray tracing method, providing realistic shadows and reflections, although the level of detail is less than what you’d get from dedicated rendering software. Users can adjust settings like lighting, materials, and image resolution to control the final output. Additionally, Revit allows the inclusion of realistic materials with accurate visual properties, enhancing the realism of the renderings.
Revit’s Internal Rendering Options
Revit provides several rendering options accessible directly within the software. The simplest is the quick preview render, ideal for checking the basic visual aspects of a model. This provides a rapid feedback loop during the design process. For higher-quality renders, users can access the “Raytrace” rendering engine, offering more control over lighting, shadows, and materials. This is suitable for producing presentation-quality images.
The rendering time increases with image resolution and the complexity of the model. Specific settings like anti-aliasing and shadow quality can be adjusted to balance render time with visual quality. These internal tools are user-friendly and readily accessible, making them a convenient option for many users.
Comparison with External Rendering Software
While Revit’s internal rendering is sufficient for many purposes, dedicated rendering software like Lumion, Enscape, V-Ray, or Arnold generally produce higher-quality and more photorealistic images and animations. These programs offer more advanced rendering algorithms, allowing for superior detail, lighting effects, and realistic material representation. For example, V-Ray’s global illumination algorithms create more natural and nuanced lighting conditions than Revit’s built-in engine.
The trade-off is increased complexity and often a steeper learning curve. Furthermore, external renderers often support higher resolutions and offer advanced post-processing capabilities, allowing for fine-tuning of the final image. The choice depends on the project’s needs and the user’s skill level. For projects requiring highly realistic visuals, the investment in external rendering software may be worthwhile.
For simpler projects or quick visualizations, Revit’s built-in tools are often sufficient.
Exporting High-Quality Images and Animations
Exporting high-quality images from Revit is straightforward. After rendering an image using either the internal engine or an external renderer, users can export the resulting image in various formats, including JPEG, PNG, and TIFF. Higher resolution images will require more storage space but provide greater detail. The choice of format depends on the intended use; JPEG is suitable for web use, while TIFF preserves more image data for print.
Exporting animations involves rendering a sequence of images, which can then be compiled into a video using external software like Adobe Premiere Pro or After Effects. Revit allows users to define camera paths and animations within the software, providing control over the animation sequence. These sequences can be exported as image sequences, which are then imported into video editing software for post-processing and final output.
The resulting animations can be used for client presentations or for internal design reviews.
Revit and Data Management
Keeping your Revit project organized and your data clean is crucial for a successful project. Poor data management leads to errors, clashes, and ultimately, wasted time and money. Effective data management in Revit involves strategic organization, consistent naming conventions, and leveraging Revit’s built-in tools.Effective data management practices in Revit ensure data integrity, improve collaboration, and streamline the production of accurate schedules and reports.
This section details methods for organizing and managing data, utilizing Revit’s scheduling and reporting capabilities, and maintaining data integrity throughout the project lifecycle.
Organizing and Managing Revit Project Data
Proper organization is paramount. Think of it like a well-stocked library, not a chaotic pile of papers. Start with a clear project setup, establishing a logical folder structure for your project files. This might include folders for different disciplines (architectural, structural, MEP), phases of construction, and specific model elements. Within Revit itself, use worksets to manage different aspects of the model concurrently.
This allows multiple team members to work simultaneously without interfering with each other’s changes. Furthermore, consistent naming conventions for families, views, and sheets are vital. A standardized naming system, for example, using prefixes indicating discipline and element type, prevents confusion and simplifies searches. For example, “ARCH-Wall-Exterior” clearly identifies the wall’s discipline and type. Regularly purging unused families and elements helps maintain a clean and efficient model, preventing file bloat and improving performance.
Creating Schedules and Reports in Revit
Revit’s scheduling capabilities are powerful tools for extracting data from your model. Schedules automatically generate tables summarizing information about elements, such as doors, windows, or materials. You can customize these schedules to display specific parameters, sort data, and filter results based on your needs. For instance, a door schedule might include parameters like door type, size, material, and location.
This data can be exported to spreadsheets for further analysis or integration with other project management software. Similarly, Revit’s reporting features allow you to generate comprehensive reports detailing quantities, costs, and other relevant project information. These reports provide valuable insights for project management, cost estimation, and decision-making.
Maintaining Data Integrity Throughout the Project Lifecycle
Maintaining data integrity is an ongoing process, not a one-time task. Regular model checks are crucial to identify and resolve inconsistencies or errors. Revit offers built-in tools for clash detection, allowing you to identify conflicts between different disciplines’ models before they become costly problems. Version control is essential for tracking changes and reverting to previous versions if needed.
Centralized worksharing allows for collaborative model editing, but it also requires careful coordination and a robust version control strategy. Employing a standardized template for your Revit projects provides a consistent starting point and ensures that all projects follow the same organizational structure and naming conventions. Finally, regular backups of your project files are a critical safeguard against data loss.
Multiple backup strategies, including cloud-based and local backups, should be employed. This ensures that even in the event of hardware failure or other unforeseen circumstances, your project data remains secure.
Advanced Revit Techniques
Okay, so we’ve covered the basics of Revit. Now let’s dive into some seriously powerful stuff – the features that will take your Revit skills from “competent” to “ninja.” We’re talking about leveraging Revit’s parametric modeling capabilities, automating workflows with Dynamo, and even customizing Revit itself using its API. This is where the real fun begins!
Mastering these advanced techniques allows for increased efficiency, design exploration, and the creation of truly complex and dynamic building models. Imagine automating repetitive tasks, creating custom tools tailored to your specific needs, and pushing the boundaries of what’s possible within the Revit environment. That’s the power we’re unlocking here.
Parametric Modeling in Revit, Revit software
Revit’s strength lies in its parametric modeling engine. Instead of just creating static geometry, you define relationships between elements. Changing one parameter automatically updates related elements, ensuring consistency and reducing errors. For example, adjusting the width of a wall automatically updates its area and volume calculations, and any connected elements like doors and windows adjust accordingly. This allows for rapid design exploration and iteration, as changes propagate throughout the model instantaneously.
This parametric approach minimizes the risk of errors associated with manual adjustments and ensures consistency across the entire project. Imagine designing a series of similar apartments – changing a single parameter, like the bedroom size, automatically updates all instances, saving hours of tedious manual adjustments.
Dynamo Scripting for Automation
Dynamo is a visual programming environment integrated with Revit. It allows you to automate repetitive tasks, create custom tools, and analyze your model data in ways not possible through the standard Revit interface. Think of it as a way to program Revit without having to write lines of code in a traditional programming language. Instead, you use nodes to represent actions and connect them visually to create a workflow.
A simple example would be creating a script that automatically numbers all the rooms in a floor plan based on their location, or generating a report summarizing the total area of all walls in a building. More complex scripts can analyze energy performance, optimize building layouts, and even generate fabrication drawings automatically. Imagine the time saved by automating tasks like generating schedules, creating sections, or even performing complex geometric analyses – all without manual intervention.
Revit API for Custom Development
The Revit API (Application Programming Interface) is a powerful tool for creating custom Revit tools and add-ins. While Dynamo is great for visual scripting, the API offers unparalleled flexibility for advanced users comfortable with programming. This allows for the development of highly specialized tools and extensions tailored to specific needs and workflows. For example, a developer could create a custom add-in that automatically generates complex structural elements based on specific design parameters, or a tool that integrates Revit with other software applications for a seamless workflow.
This level of customization allows firms to streamline their processes and create highly specialized tools that improve efficiency and productivity. Consider a large architectural firm that develops a custom tool to automatically generate shop drawings for curtain walls based on specific manufacturer profiles; this significantly speeds up the detailing process and reduces errors.
Revit for Sustainability and Green Building
Revit’s capabilities extend far beyond basic building design; it’s a powerful tool for integrating sustainable design practices throughout the entire building lifecycle. By leveraging Revit’s features, architects and engineers can model, analyze, and optimize building performance for energy efficiency, reduced environmental impact, and improved occupant comfort, contributing significantly to green building initiatives. This section explores how Revit facilitates sustainable design and provides a glimpse into the practical applications of its sustainability-focused tools.
Revit offers a suite of tools and functionalities directly supporting sustainable design. These features allow for the early integration of sustainable strategies, leading to more efficient and environmentally responsible buildings. This proactive approach is crucial, as design decisions made early in the process significantly impact the building’s long-term environmental performance.
Revit Features Supporting Sustainable Design
Revit’s ability to link with energy analysis software, such as EnergyPlus, allows for the simulation of building performance under various climate conditions. This provides valuable insights into energy consumption patterns and helps identify areas for improvement. Furthermore, Revit’s visualization capabilities enable designers to showcase the impact of sustainable design choices on building performance, aiding in communication and decision-making.
For example, a designer can model different window types and immediately see their effect on solar heat gain and daylighting within the model. Other features, like the ability to schedule materials with different embodied carbon values, support informed material selection for minimizing the building’s overall carbon footprint. Finally, Revit’s analysis tools, such as solar studies and daylighting analysis, allow for the optimization of building orientation and design elements to maximize natural light and minimize energy consumption for lighting.
Energy Efficiency and Building Performance Analysis with Revit
Using Revit to analyze energy efficiency and building performance involves a multi-step process. First, a detailed building model is created, incorporating all relevant building components and their properties (materials, glazing types, etc.). Then, this model is exported to energy modeling software, such as EnergyPlus or Sefaira. These programs use complex algorithms to simulate the building’s energy performance based on various parameters, including climate data, occupancy schedules, and equipment performance.
The results, including energy consumption profiles, peak loads, and potential cost savings, are then imported back into Revit for review and analysis. This iterative process allows designers to make informed decisions to optimize the building’s energy efficiency, minimizing its environmental footprint. For instance, a designer might experiment with different building envelope designs and compare their energy performance in Revit to select the most efficient option.
Integrating Sustainability Analysis Tools with Revit
The integration of sustainability analysis tools with Revit typically involves a workflow that begins with creating a detailed Revit model. This model should accurately represent the building’s geometry, materials, and systems. Then, the model is exported in a format compatible with the chosen sustainability analysis tool (e.g., gbXML for EnergyPlus). The analysis tool then processes the model data and performs the simulation.
After the simulation is complete, the results are typically exported in a format that can be imported back into Revit or viewed separately. This data might include energy consumption, daylighting levels, or thermal comfort metrics. The designer can then use this feedback to refine the design, iterate on different options, and ultimately create a more sustainable building.
For example, if the analysis shows that a particular building facade design leads to excessive solar heat gain, the designer can modify the design in Revit and re-run the analysis to evaluate the impact of the changes. This iterative process allows for the optimization of building performance based on data-driven insights.
Final Review
Mastering Revit software isn’t just about learning the software; it’s about understanding how to leverage its capabilities to streamline workflows, enhance collaboration, and ultimately, build better buildings. From the initial conceptualization to the final construction documents, Revit empowers teams to visualize, analyze, and manage every aspect of a project with unprecedented efficiency. This guide has provided a solid foundation, but remember that continuous learning and practice are key to unlocking Revit’s full potential.
So, dive in, explore, and start building your expertise!
Essential Questionnaire
What’s the difference between Revit LT and Revit?
Revit LT is a more affordable, scaled-down version ideal for solo practitioners or smaller firms. It lacks some advanced features found in the full Revit suite, like worksharing and certain analysis tools.
Can I import data from other software into Revit?
Yes! Revit supports importing various file formats, including AutoCAD DWG/DXF, SketchUp SKP, and more. The specific capabilities depend on the file type and Revit version.
How steep is the learning curve for Revit?
It has a fairly steep learning curve, especially initially. However, with dedicated practice and utilizing online tutorials and resources, you can steadily build proficiency.
Is Revit only for PCs?
Currently, Revit is only available for Windows-based PCs. There’s no official Mac version.
What are some good resources for learning Revit?
Autodesk offers official tutorials and support documentation. Numerous online courses (Udemy, Coursera, etc.) and YouTube channels provide excellent learning materials.